Nutella Brownies

Gluten Free Nutella Brownies

½ C Almond Flour
13 oz Nutella
2 eggs
¼ c Chocolate chips

Mix all ingredients together.
Pour into a greased 8×8 pan.
Bake at 350 degrees for 30 minutes.

img_7673

Tips and Tricks

  • Warning:
    • These are dangerously delicious. The first batch I made, I tried one, then accidentally ate a whole row. I may have accidentally ate half a pan just today.
  • Mixing:
    • I throw everything except the chocolate chips in the mixer for a few minutes on the second lowest setting, then stir in the chocolate chips. The dough is so sticky that it is annoying to mix it all by hand.
  • Pan:
    • Use an 8×8 pan, a 9×9 is too big.
  • Flour:
    • All-purpose flour works fine, but obviously won’t be gluten free.
    • Brownies seem moister with the almond flour.
    • With all-purpose flour, the brownies have fewer calories.
  • Nutella:
    • I rarely use name-brand Nutella. Mostly I actually use “Hy-Vee Hazelnut Creamy Spread With Skim Milk & Cocoa”, but that’s kind of a mouth-full.
    • I usually buy the 13 oz jars and use the whole thing, that way I’m not tempted by leftover Nutella. I have bought the larger, 26.5 oz jars and used ½ each in two different batches.
    • If you are measuring, one heaping cup will be close enough.
  • Chocolate chips:
    • Chocolate chips are technically optional, but I think they make huge difference.
    • I use 60% cocoa chips.
    • I actually measure my chocolate chips by weight – 45 g.
  • Serving:
    • I’ve had most success serving straight from the pan.
    • I usually cut all my treats in small sizes, I find people tend to take more that way. (I like to say: cut them twice as small and people will take 3 times as many.)
    • Plus, my last batch was only cut into 9 pieces, and I just kept eating a whole piece at a time instead of cutting it smaller.
  • Nutrition
    • Cut 4×5: 135 calories each
      • 9 g Fat, 3 g Saturated Fat, 20 mg Cholesterol, 12 mg Sodium, 7 mg Potassium, 12 g Total Carbs, 2 g Dietary Fiber, 12 g Sugar, 2 g Protein
    • Cut 3×3: 299 calories each
    • All-purpose flour, cut 4×5: 66 calories each
      • 3 g Fat, 1 g Saturated Fat, 19 mg Cholesterol, 10 mg Sodium, 10 mg Potassium, 7 g Total Carbs, 0 g Dietary Fiber, 5 g Sugar, 1 g Protein
    • Nutrition calculated by MyFitnessPal.
Posted in Gluten Free, Recipe | Leave a comment

Labels

I knit weird. I didn’t even realize it until I’d been knitting for about a decade. I was trying to learn a new stitch by watching you-tube videos and I realized that the lead-up stitches didn’t match the way I knit. There are two main knitting styles: English and Continental. I knew I didn’t knit English style, which is the most common in the US, but I always figured that I knit Continental.

I knew that I knit a little strange, because I knit ambidextrously, but I always figured that I knit Continental style, just backwards with one hand and forward with the other. Now that I knew I didn’t knit English or Continental, it explained why I was having so much trouble figuring out that stitch. (And why I tend to have problems with patterns in general.)

I watched more videos and learned how to knit English and Continental, but I decided that I like knitting my way best. It means that I have to think through a new pattern instead of simply following the given directions, but I had to do that anyway, to translate it for knitting with both hands.

A year after I learned that I didn’t knit Continental, I was again browsing knitting blogs and videos and I found learned something new. I’m not the only one that knits this way! There’s even a name for it! “Combination Knitting”. Or “Eastern Uncrossed” (most places strongly claim that there is a difference, but I haven’t found it). In fact, there are a lot of other ways of knitting besides the two I’d always heard about.

The great thing about having the proper name for something is that now you can Google it. I read all about my newly discovered label, and even bought a book about Combination knitting.

In practical terms, once the excitement had worn off, knowing the name hasn’t changed my knitting much. I now have a few more resources and I know the keywords to search if I get stuck. I understand a little better how to translate patterns so that I can use them, and how to translate my patterns so others can use them. If you look at the patterns I post, you will see that they tend to be more “knit in stockinet” or “decrease” rather than specific stitches.


I read a lot of fanfiction. A little over a year ago, I was reading a lot of asexual-Sherlock/John Watson fics. I was also reading a lot of Cabin Pressure fics (Martin/Arthur).

I imagined a conversation between Martin and a demi-sexual Arthur. (If you know Cabin Pressure, think: the conversation about how planes fly.) (If you don’t know Cabin Pressure, go listen to it – it is a British radio comedy and it is hilarious.) I was imagining them talking about sexual attraction.

In one episode of the show, they meet an actress from one of Arthur’s favorite movies, and she turns out to be a jerk. I imagine Martin worried about Arthur after this, and the conversation starts from there.

Arthur isn’t really upset, and Martin is confused. Arthur is like: “I liked the character, not the actress, how could I like the actress, I didn’t even know her?” Martin is trying to explain attraction, and getting all flustered and frustrated. Arthur is being all cheery and “Yeah, but not really.” And “People say that, but you can’t really like someone if you don’t know them.”

And I got stuck, because I had plenty of words to put into Arthur’s mouth, but none for Martin. I stopped, and thought: “Huh. Am I asexual?”

I did some googling, read some stuff, downloaded “The Invisible Orientation” from Amazon. There were a lot of things I read that made me think “That. That’s me.” I finally decided that the label suits me. I now identify as asexual.

I bought a necklace in ace colors, I made myself an ace pride hat, and I got an ace ring I like to wear. And I go about my life. Nothing much has changed outside of my head. It’s just that now I have the words to describe how I feel and I know I’m not the only one.

Overall, I ‘m still more excited about “Combination Knitting” than “Asexuality”.

After all, labels don’t define you, they just help with keyword searches.

Posted in Uncategorized | 1 Comment

Folly Cosplay Part 3: Stockings

“she wore stockings instead of shoes – green and white polka dots on one foot and orange and purple stripes on the other”

I’m interpreting ‘stockings’ as knee-high socks. I have to be a little careful buying tall socks because I have wide calves, so a lot of knee-socks won’t fit, especially ones with patterns.

Striped socks are easy to find, no matter what the color combination.

img_7320

Socks with polka dots, not so much. I would have gone with anything that could reasonably be described as ‘green and white polka dots’ – white with green polka dots, green with white polka dots, some other solid color with both green and white polka dots. I did find one that was green with white polka dots that would work (https://www.amazon.com/Pairs-Womens-Design-Colorful-Patterned/dp/B016P54C66/ref=cm_cr_arp_d_product_top?ie=UTF8), but from the reviews, I would probably have trouble with the fit and it wasn’t prime eligible so I would have to pay for shipping and take my chances of it getting here on time. Plus, I had another plan.

img_7315

I found a pair of white knee-socks at Joann Fabric, and I have a rather large collection of sharpies, fabric markers, and fabric paint. I used a roll of electrical tape as a stencil. I used an old white sock to try out the different markers and practice using the stencils (I had two rolls of tape in slightly different sizes).

img_7361

I washed the sock to see how the colors would hold up.

img_7365

The Marks-a-lot marker bled, so that was out. I liked the Sharpie fabric marker best for color and ease of application.

img_7657

Some of the dots are a different color, because I ran the marker dry. I used a regular Sharpie to go over the dots that were partially covered and to add a few more. I used both of the tape-stencils.


https://www.amazon.com/AJs-Adult-Striped-Knee-Socks/dp/B007XGDTHA/ref=cm_cr_arp_d_product_top?ie=UTF8

http://www.joann.com/adult-white-socks-size-9-10/10695476.html#q=socks&prefn1=prod_type&prefv1=Product&start=4

Posted in Cosplay, Folly Cosplay | 1 Comment

Folly Cosplay Part 2: Hat

“the band of her too-large top hat was fairly bursting with folded pieces of paper”

I bought the hat on Amazon and I love it. It was even intended for a steampunk costume and came with goggles. I didn’t need goggles for this costume, but they’re kind of cool.

img_7318

https://www.amazon.com/Steampunk-Black-Top-Silver-Goggles/dp/B00TROGDRY/ref=cm_cd_al_qh_dp_t

I started with a bunch of printer paper folded up and put in the band, but it didn’t look right. It looked too… new.

img_7343

So I took all of the paper out and stuck it in my purse or pockets for a few days. After that,  I wrote on the inside of all of the papers, folded them, and stuffed them in the band.

Now that I had my hat done, the next challenge was getting the hat to Atlanta without damaging it. I had planned to keep the box it was shipped in, but when I went to pack my suitcase I realized that it was too big.

I took that box and cut the top off to make it shorter. For the lid, I used a box that originally held cans. I cut slits half way down the lid and an equal distance down the top of the large box, so that they would lock together firmly.

You can see that the part of the box that is not covered by the lid is cut on a slant. While the box fit in my suitcase, it didn’t account for my glaive. There is a part of another costume that has to fit diagonally across my suitcase. So this box can’t sit flat in the bottom of the suitcase, it has to rest partially on top of something else. I had to cut off the corners of the box to make it fit.

I didn’t want to cut the side of the box to make it narrower, because I felt hat would make the box less sturdy.

It worked, I got the hat there and back still looking perfect.

Posted in Cosplay, Folly Cosplay | Leave a comment

Halloween Cubicle Decorating 2013 – Gru’s Website

I realized I never posted my first foray into Halloween cubicle decorating.

In 2013 my department did a minion themed skit and I had fun with some minion theme decorating.

img_1755

I learned that the best way to draw on balloons is to use dry erase markers. You should not use Sharpies, because the marks will liquidate if the balloon pops and stain things. Glad I did my internet research before trying that. (Most references were from clowns.)

img_1771

In the skit, I played Edith. I put way too much effort into that sweater.

img_1772

“Web” site – get it? 🙂

img_1762

I built a string web across the top of my cube and hung minion balloons from it.

img_1814

I built a web against my largest cube wall and trapped some minions in it. The backdrop here is a black sheet from a thrift store. I have some Halloween garland across the top that I bought at an after-Halloween sale at some point. The other walls were covered with tablecloths I got at after-Halloween sales. (I don’t like paying full price for decorations.)

img_1760

It was hard to get a good picture of this, but the corner behind my short wall (where my guest chair sits), was completely webbed off and filled with minion balloons.


I painted a few minion gourds too. (I sometimes go a little overboard on things…)

img_1810

The main reason I ended up with so many is that I had to figure out the best way to turn a gourd into a minion. (My conclusion: use a spaghetti gourd, they are already the right color and shape, just add the coveralls and features.)

That purple thing in the front is my fluffy unicorn pumpkin.

img_1809

Yes, there is a pumpkin under there.

I used this for my entry to the mini-pumpkin decorating contest. I knew there would be a lot of minions entered, so I wanted to do something else. I printed out an “It’s so FLUFFY!!!” sign to display with it.

To make the unicorn, I painted the pumpkin purple, including the stem. I wrapped the pumpkin with sparkly purple eyelash yarn, gluing the ends to the pumpkin with white glue. The legs are a paper bowl, cut and painted purple. I finished it off with a couple of googly eyes.


Costume: https://geekgirlmae.wordpress.com/2014/07/05/dispicable-me-edith-gru-costume/

Food contest: https://geekgirlmae.wordpress.com/2013/11/05/unicorn-poop-cookies/


Posted in Halloween | Leave a comment

The Difference a Year Makes

This was my third year going to DragonCon. Last year was my second year going and my first year really wearing costumes for it. (The first year I just wore a couple of Star Trek uniform t-shirts.)

At DragonCon last year, I heard about a Facebook group called Drop By Dragoncon, and when I got home I joined it. My goal was to stop needing larger clothes – I am far to old to be outgrowing my clothes. I tried to improve my fitness a bit in the fall, but didn’t get serious until just after the new year when I started using MyFitnessPal.

I also spent some time working on my costumes. For the only costume I was sure I was going to repeat (my Kel costume), I started thinking of ideas for improvement during con last year.

This costume I completely changed. Last year I was Amy Pond (from Dr Who), this year I was Folly (from Astronaut’s Windlass by Jim Butcher).

Lady Knight Keladry of Mindelan, aka Kel. I revamped this costume a bit. I’m still wearing grey dress pants, but instead of two shirts I sewed myself, I’m wearing a tunic shirt I bought online. I also added to my accessories.

Kaylee from Firefly. This costume probably shows the change in me the best, as the coveralls are the same. I didn’t change much in the costume, just changed the shirt and reapplied the patches. (Although I can’t believe I put the teddy bear patch on the wrong side this year.) I also repaired the seams I ripped out last year, and hemmed the legs.


Posted in Cosplay | 1 Comment

Folly Cosplay Part 1: Spectacles

Spectacles

“She was dressed… not so much untidily, he decided, as randomly.” The Aeronaut’s Windlass by Jim Butcher p83

I’m working on a new costume for DragonCon, and I only have a month left, but I’m really excited. I’m going as Folly from Jim Butcher’s new book The Aeronaut’s Windlass. I have a hard time deciding on my favorite character, but I definitely like Folly’s look best.

First piece competed: “One lens of her spectacles was pink, the other green”

I found two pairs of identical glasses with tinted lenses – one with pink lenses and the other with green. Then I swapped one of the lenses.

IMG_7302

It was harder than I expected, because there was no screw holding the frame around the lens and the lenses wouldn’t pop out easily. I bent up one of the frames with pliers until I found the trick of popping the lens out. I grip the top of the frame above one lens with pliers then gently tilt the pliers backwards to pop the lens out of the front of the frame. When I was working on my final glasses I put a piece of cloth around the pliers so I wouldn’t mar the glasses.

IMG_7323

IMG_7306

Popping the lenses back in was pretty much the same process in reverse. The lenses pop mostly into place by hand, but with the top of the lens resting in front of the frame. Sometimes I had to use the pliers slightly on each side of the top before popping it the rest of the way in.

IMG_7314

I love how they turned out.

https://www.amazon.com/Lennon-Vintage-Silver-Shades-Sunglasses/dp/B00EUUQICA/

https://www.amazon.com/gp/product/B00GF1DYQA?ref%5F=oh%5Faui%5Fdetailpage%5Fo04%5Fs00&redirect=true&psc=1&pldnSite=1


Pieces left to do:

  • Grey shirt with patches – I have the shirt, need to sew on patches
  • Green undergown – I have a green skirt I think I can use, but it needs mended and maybe altered
  • Stockings – I have one and an idea for the other
  • Apron – I have material for this, I just need to construct it
  • Hair – not sure how I’m going to do this, need to look through my yarn stash
  • Top hat – Just got delivered from Amazon today, and it looks awesome. I still need to decorate it.
  • Necklace – I have the materials, just need to put them together
  • Gun belt – Have the materials, need to assemble
  • Jar of crystals – Have the materials, need to assemble
Posted in Cosplay, Crafts, Folly Cosplay | 1 Comment

Flue Liner Shelves

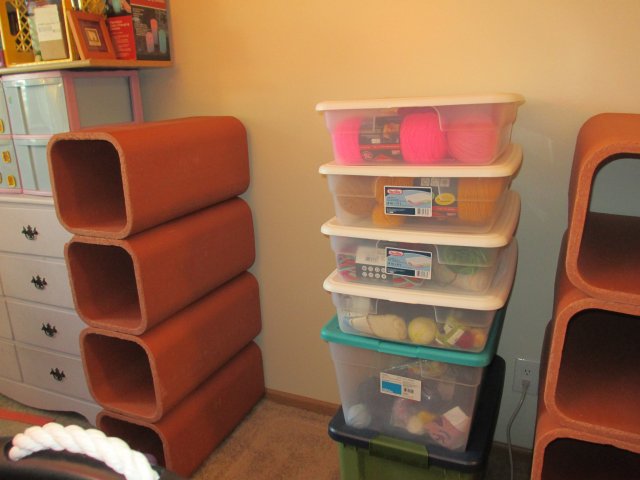
The Goal: A better way to manage my yarn bins. It was awkward to get to the bins on the bottom, and when bins are stacked that high they get unstable. Plus, most of my clear bins are cheap, and the lids start to buckle if there is too much weight stacked on top of them.

01-IMG_6448

Before

I was thinking of a large shelf so I could stack bins both under the shelf and on top of it. I needed it to be very sturdy enough to support bins on top and wide enough and tall enough to stack bins underneath.

I had a long board (that lived it’s first life as the side of an entertainment center) that I could use as the top of the shelf. It was the right length and almost the right width (it could have been a bit wider).

My favorite home improvement show is an old one called “Home To Go” and something they’ve used a few times is clay chimney liners (or flue liners). I thought that could make a good base for my shelf.

I did look into buying narrow wooden shelves to put the board across, but I couldn’t find what I wanted in terms of dimensions, sturdiness, and price. There were some that might have worked, but I would need arrange them two deep, or the price was more than the flue liners, or didn’t trust them to be sturdy enough to hold up under the weight.

I could have chosen something solid for the sides, maybe stacked milk crates, but I didn’t want to waste the space. I knew the flue liners would be sturdy enough to hold up to anything I could put on them, and I could use the liners themselves as additional storage.

02-IMG_6381

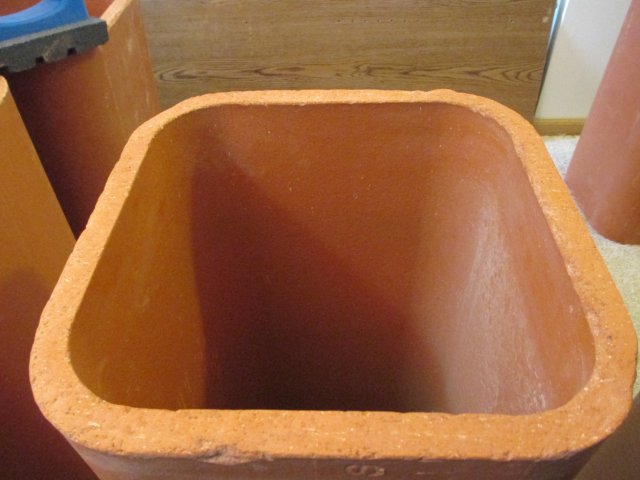
I special ordered 12″ x 12″ x 24″ flue liners from Menard’s. I did use a measuring tape when ordering, but when I first saw them in person they were bigger than the image in my head. Especially since I bought eight of them.I managed to fit them all in my car – I’m really glad the guy at Menard’s helped me load them. I should have packed some towels or something between them – I winced every time I went over a bump and they all clanked together, but they all made it home fine.

I also didn’t quite realize how heavy they would be. In my mind they were something like terracotta, but really they are more like brick. (They are actually vitrified clay, which is also the preferred material for sewage pipes, because almost nothing will corrode it and it won’t deform much under pressure or temperature.)

Luckily, my apartment has shopping carts and an elevator that goes all the way to the parking area. It still took me four trips to get them all. Once they were in my apartment,  I stuck furniture sliders under them to move them around.


The next challenge (after getting everything home), was how rough the edges were. They would snag my clothes if I even walked near them. Google failed me – I couldn’t find anything online about how to smooth them. Pretty much the only craft use I found was pouring concrete in the bottom of one and turning it into a super-heavy planter.

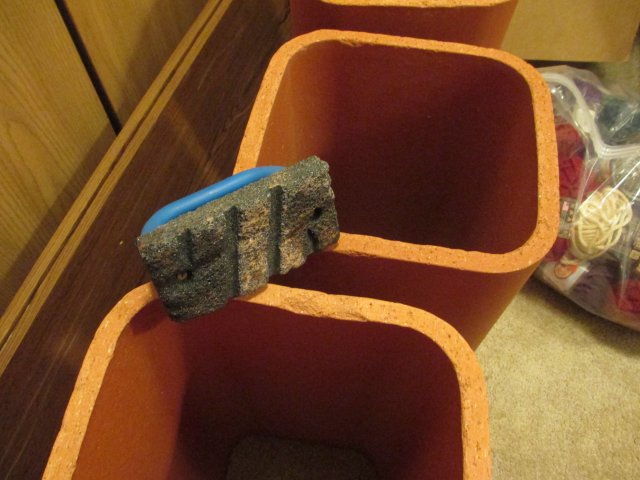
I tried sand paper, but it just didn’t hold up. Eventually, I found a concrete rub brick. It is used to smooth seams in concrete. It’s essentially a rough brick with a handle, but it worked great to smooth the edges. It still took time and elbow grease (and clay powder everywhere), but I’m happy with the results.

05-IMG_6388

I did a number on the concrete rub brick.

08-IMG_6447

Even with smooth edges, I was worried about the heavy liners rubbing against the walls. So, I put hot glue dots on the edge that would go against the wall. I used the high-temp glue gun, instead of the low-temp ones I usually use for crafts, so the dots would be more durable.

09-IMG_644910-IMG_6451

Next step was stacking the liners.

11-IMG_6466

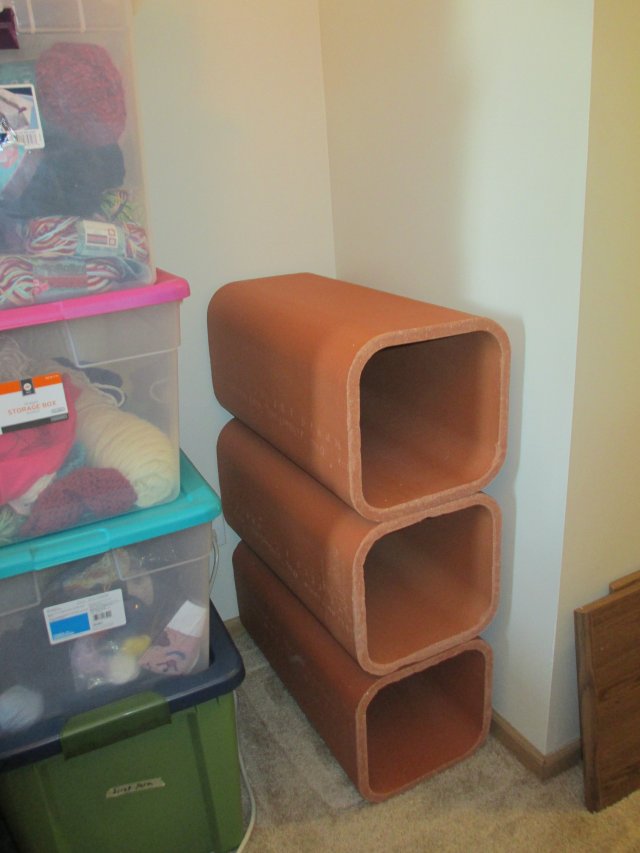
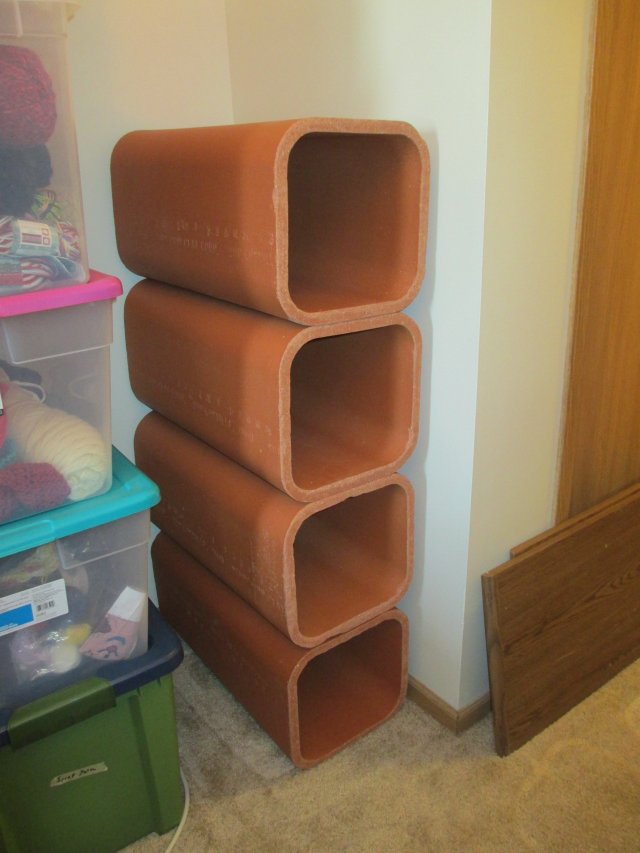
I was a little worried about how stable a stack would be when stacked four tall, but it turned out fine. It rocks a little but if I push on it, but not enough to worry me. (If there would be small children around, I might be more concerned, but storage room isn’t really safe for small children anyway.)

12-IMG_6467

I considered putting shelf liner between the layers, but they don’t slide against each other easily. Plus, it was enough of a pain to get each one lined up with the one below, adding another layer in between, especially one that would further inhibit sliding, would not have helped.

13-IMG_6468

I would have pushed the right stack a bit more towards the center, but there’s an outlet back there I didn’t want to cover up.

14-IMG_6470

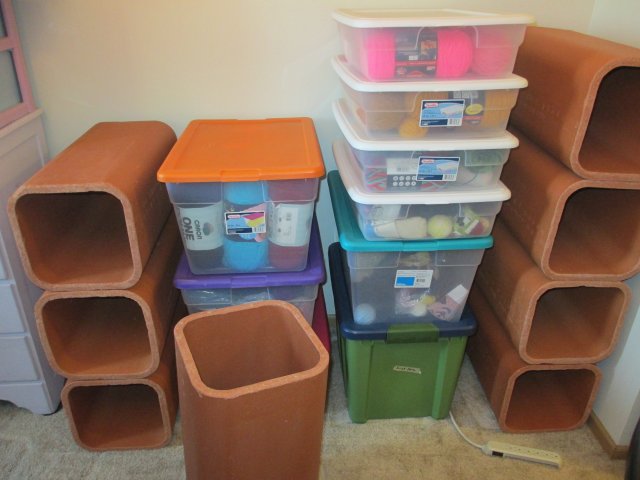
I am super happy with how it turned out.

15-IMG_6474

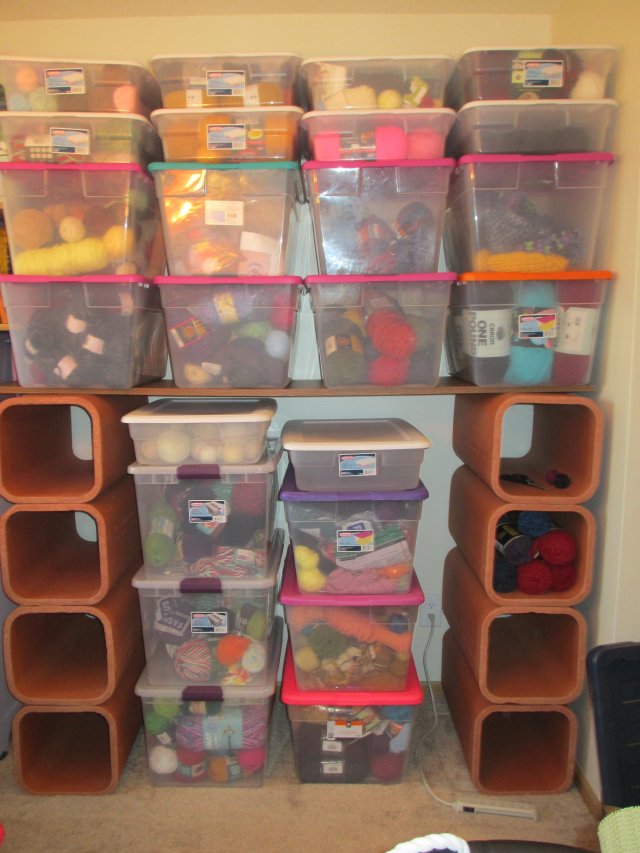
I switched a couple of  the bins, to get matching types. Now I’m excited to go through them and sort all my yarn. I’m even considering doing another to put next to it (I have a lot of bins…).

Posted in Crafts | Leave a comment

Baby Blanket (Tiles)

Bernat Blanket Yarn – “Little Boy Dove” (I think it was about 3 10.5 oz skeins)

Size 7 needles

Based on “Tiles I”: http://www.craftcookie.com/knitting-stitches/knit-purl-stitches/117-tiles-i

CO 86 stitches

Row 1:  slip, k, *p5, k2* x12
Row 2:  slip, p, *k5, p2* x12
Row 3:  repeat row 1
Row 4:  repeat row 2
Row 5: slip, k, *k5, p2* x12
Row 6: slip, p, *p5, k2* x12

Repeat rows 1-6 until reach desired length

16-IMG_6220

It ended up wider than I intended, and I might go narrower if I use this pattern again, but I’m really happy with how it turned out.

15-IMG_6219

I love working with this yarn. It’s a chenille type yarn, so it’s really easy to work with, and it’s so bulky it knits up fast. It is so soft and snuggly that the finished piece is very satisfying. Plus, it’s a sturdy yarn: 100% polyester and machine washable, so you don’t have to be careful about using the finished product.

I had the blanket sitting on the back of my couch for a couple of weeks before I wrapped it up, and I kept pulling it down to snuggle under. At some point, I’m going to make myself a Blanket Yarn blanket.

17-IMG_6216

After all of the knitting was done, there was one more challenge I had to address. Months before I started the blanket, I found a gag gift box that I really wanted to use. Unfortunately, the blanket ended up being about twice as big as the box. But I was absolutely determined to use this box.

I had a travel Space Bag that I put the blanket in, the kind that you are supposed to roll up to squeeze the air out. I compressed it, and squeezed it, and sat on it until I couldn’t get it any smaller. And it still didn’t fit in the box. I could have jammed it in, but it would have bulged and maybe even torn the box. I used some painters tape to try to get it into a more box-like shape. Then I wrapped the tape all the way around, to make sure it wouldn’t come undone. Then I wrapped it in more tape… I realized that I could compress it a bit more using the tape, so I taped the heck out of that thing.

In the end, it was worth it. I got the blanket to fit into the box! And they even believed that I actually got a ‘Crib Dribbler’. (Then again, that may be more a testament to my character than to the convincing-ness of the box. 🙂 )

18-IMG_6307 19-IMG_6308

Posted in Knitting | Leave a comment

Knit Doggy Bag

Color chart: http://twostrands.com/2010/10/01/the-dearest-beast-is-dead-long-live-the-dearest-beast/ (the author’s Ravelry is here: http://www.ravelry.com/designers/mary-ann-stephens, she has some beautiful designs)
Yarn: Lily Sugar ‘n Cream Blueberry, Hot Pink, Country Yellow; Crafter’s Secret Cotton Brown (I would have preferred to use all the same brand, but I couldn’t find the shade of brown I wanted in Sugar ‘n Cream)
Needles: Size 3 circular, used as straight; size 2.75 double pointed for strap

15-IMG_4086

A friend of mine has a new golden retriever that she is quite fond of. (Personally, I don’t get it; she’s a big, overly energetic puppy. But I tend to prefer dogs that return the favor when I ignore them.) I found the adorable color chart online and decided to use it to make a little purse. I poked around for a purse pattern, but I didn’t find what I wanted, so I winged it.

18-IMG_4092

The first try, I thought I’d knit in the round. I got a few rows in when I remembered that I don’t want to do color work in the round, especially when I need the back to be decently finished.

01-IMG_4026 02-IMG_4027

Entire pattern is knit in stockinette, except where noted.

CO 40 stitches (I would consider 39 or 41 next time), knit 49 rows. (I had completely finished and cast off, when I realized that about 7 rows in I had picked up the project and knitted the wrong way. So there are about 14 stitches on the left that have 51 rows.)

Purl (wrong side, or knit right side) one row, for the bottom of the bag

Knit 7 rows before starting the pattern. Knit pattern from the bottom up. I added 6 stitches to the left of the pattern and 7 stitches to the right. The first row, at the bottom of the collar, has 16 stitches to the left of the color.

03-IMG_4029

Knit the pattern: 35 rows. Knit 10 more rows, for a total of 52 rows – aiming for 2 rows more than the front of the purse.

Purl (rs, knit ws) 2 rows for the top of the bag. (Could probably do 3 rows if you wanted.)

07-IMG_403209-IMG_407105-IMG_406712-IMG_4074

The rest is the front flap. I intended for the flap to start the same width, then decrease steadily at the start and end of each row, and end with the point somewhere between 1/2 and 2/3 of the way down. I wanted the bone larger bone from the color grid centered and the edge two or three stitches away from the bottom corner of the design. Unfortunately, I messed up my math somewhere and the decreases where about to the design, so I had to modify the decreases on the fly. I did get it centered, so the problem must be with either the start of the decreasing, or the rate of decrease.

06-IMG_4068

Knit 5 rows before starting the design. There will be 9 stitches to the right of the pattern. Knit 15 stitches to the right of the first row of the design.

Start decreasing on the 8th row of the pattern. Decrease at the start and end of rows 8-14. Row 15, decrease at the start (right) but not the end. Row 16 and 17 no decrease. Row 18 decrease at the beginning (left) but not the end. Rows 19 and 20 decrease at the beginning, but not the end. Continue decreasing on both ends until you reach 4 stitches.

Button hole: Knit the first 2 stitches, then turn. Knit back 2, forward 2, back 2, then forward 4, going back to the other stitches still on your needles. Knit those two stitches up to match the others, then knit all the way across. Decrease the first and last stitches, leaving 2 stitches. Knit these last two stitches together, pull the yarn through, and weave the end in. I found it most convenient to weave it in along the edge.

10-IMG_4072 08-IMG_4070

Fold along the purl rows.

11-IMG_4073

Whip stitch the edges. Start at the bottom and work your way up to keep the rows matched up. Use the same brown as the outline of the design.

14-IMG_4084 13-IMG_4083

I stitched over the edges a few times, both to make sure the edges are firmly bonded and to give it a solid look.

The strap is a 4 stitch wide i-cord. I picked up 4 stitches at the top of the seam on one side, 2 stitches on each side of the seam. I-cord to the desired length, then join to the other side of the bag. I picked up a stitch from the bag every other stitch of the strap then knit them together. Knit first and second and the third and fourth stitches together. Knit the last two stitches together. Cut a long tail and pull through. Use the tail to whip stitch around the join. I went back and stitched around the top of the other side too, where the strap started. I’m sure there were better ways to do the joins, but this is what I did.

17-IMG_4090 16-IMG_4088

If I ever do one of these bags again, I am going to start with the button. I had an image in mind for the button, but I forgot check if such a button existed. I imagined something like bonz candy (http://www.amazon.com/Candy-By-The-Pound-Bonz/dp/B00A5QVR0G) but a little bigger; in white or off white. I found a bone shaped button, but it wasn’t exactly what I wanted. I kept looking and I found some paw print buttons. In the end I’m happy with how it turned out. I did have to stretch out the button hole a bit to make it fit.

1-IMG_4248

I have to admit, my favorite part of this project is the name. See, it’s a bag, with a doggy on it…. it’s a “doggy bag”!!!!

2-IMG_4249

Posted in Knitting | Tagged , , | 1 Comment